<-!->

Home About Beauty Fashion Lifestyle Shop Image Map

Tuesday, December 31, 2013

If I Were Going Out for New Years Eve...


I never go out for New Years Eve, but if I did go out and celebrate I think I would have worn this outfit! I love this skirt I got last year from Asos and I have never worn it! I think New Years would be the perfect occasion for a little gold metallic action. Before actually going out I believe I would have a) ironed my top and b) made sure my leg warmers were the same height, hehe. Speaking of my top, it's super old from Forever 21 when I went through a one-shoulder phase. My shoes are by Michael Kors and I probably wouldn't have worn open toed shoes like this but I rarely wear heels so I only have a few pairs here with me! I think with the tights, and the fact that you're probably in a dark place on New Years Eve, I could get away with it! My earrings are a matte black finish from Betsey Johnson and I thought that even though New Years is a great time to be sparkly, these would be a nice contrast with the metallic in the skirt.

I hope you all have a great New Years Eve and I know that even though I had a few stand-out events happen in 2013, I am ready to leave this year behind and start fresh with a positive new attitude!

Happy New Year!

Sunday, December 29, 2013

Photo Diary: December


1. My boyfriend and I got our Christmas tree! I was so excited because it was a real tree and it was so perfect :)

2. I really enjoyed it being cold enough so far for me to wear my big puffy coat with a furry hood and bundle up with scarves, earmuffs and gloves!

3. It snowed 3 times already, which was really exciting and so pretty!


4. I celebrated my 23rd birthday and had such an amazing day.

5. When my mom visited me for Thanksgiving she bought me this vest and I've been loving playing with it! I think I'll do a post in the near future featuring it!

6. I painted my nails red for Christmas and I tried my best at some nail art so I did white and silver glitter polka dots. I had a few nails plain just because I liked the red on its own :)


7. My boyfriend and I celebrated our 2 year anniversary and this was his dinner. It was Alfredo with scallops, shredded crab and shrimp and I know it was so delicious because I ate the leftovers :)

8. We opened our presents to each other a week and a half early and had so much fun on our little "pre-Christmas" Christmas day :)

9. One of the things my boyfriend put in my stocking was the giant Reese cups that are a 1/2 pound each because I'd been eyeing them for so long! In case you're wondering, they are gone...and they were delicious.

I had a really fun month leading up to Christmas. I love drinking hot chocolate with tons of marshmallows and watching Christmas movies, doing things around the house and listening to Christmas music and being part of the hustle and bustle of holiday shoppers! I had a great time at home with my family, catching up and eating lots of yummy food. I was so grateful to have received some lovely things and everyone seemed to enjoy the gifts I got them as well :)

I hope you all had great December's and a great holiday season!


Friday, December 27, 2013

Get Ready With Me: Soft Eyes and Flushed Cheeks


1. elf Essential Eye Primer on lids and around mouth, check out my review, here.
2. Maybelline Fit Me Foundation in 110
3. Covergirl Outlast Stay Fabulous in 810- I mix the two foundations because the Covergirl is too dark but I want to use it up
4. Physicians Formula Conceal RX Concealer in Natural Light
5. Maybelline Instant Age Rewind Under eye Concealer
6. Milani Brow Tint Pen in 02 Dark Brown
7. Covergirl shadow #1 in the Eye Brightening 700 Vibrant Browns Palette- all over the lid
8. Benefit shadow in Leggy- Packed on top of the first shadow 
9. Essence eyeshadow in 035 Party All Night - I've been obsessed with this in the crease!
10. Urban Decay Shadow in Faint from the Naked Basics Palette- I put this on top of the Essence shadow to deepen the crease slightly.
11. NYX Chocolate Liquid Liner - The easiest liquid liner I've found!
12. L'Oreal Smoldering Eyeliner in Brown
13. Maybelline's The Falsies Mascara
14. MAC Emote as contour
15. MAC Creme Color Base in Madly Magenta as blush

Here's the look!


I have some old acne scars and a couple small breakouts (I'll tell you guys about that later, it's actually a "good thing" hint: Christmas present ;) that I like to cover. If you're looking for a concealer with good coverage to cover acne or any discoloration, I highly recommend the Physicians Formula RX Concealer. Overall, I like a medium coverage on my skin, with the focus being on spot covering the discoloration. Normally, I have really oily skin, but since it's pretty cold outside, I haven't even been needing to powder so I skipped that step!

The MAC Creme Color Base in Madly Magenta is a little intimidating in the pan and if you want a full review check out this post. What I love about it, though, is that it gives the prettiest flush of color on the cheeks and can look so natural if you apply it lightly (I really like the color, so I built it up a little ;).


I've been loving the creamy Covergirl shadow because it brightens the eyes up so much and you can basically put any color in the crease after using that as a lid color. The Benefit eyeshadow in leggy is a light pink shimmer shadow and I didn't like it when I first got it because I wasn't crazy about the pink hue. I decided to use it this day after I had already applied the Covergirl shadow and I actually thought it was really pretty. It's still really neutral and it had a nice soft look.


There's nothing on my lips because I don't do that step until I leave the house but I went for a nude lip that day because that's my go-to!

Don't you love the power of makeup? Let me know what you guys think and I've reviewed most of these products so I linked a few, but if you have any questions about any products I used leave them in the comments! :)

Wednesday, December 25, 2013

Merry Christmas!

Image courtesy of Google.


I just wanted to say a quick Merry Christmas to all of my lovely readers and new friends. I hope you all are having a magical day with your loved ones.  I'm so happy I decided to start blogging again because I've had so much fun and it's been amazing to see something I work so hard on grow everyday. It means so much to me that you all follow my little blog and take the time to read my thoughts. Being a part of this community has become a big part of my life and I'm so appreciative for all of your support and all of the lovely comments you leave me. I can't wait to see what the new year holds for us!

Monday, December 23, 2013

My Christmas Decor!

I couldn't let the Christmas season pass without showing you guys a peak of my Christmas decorations! I didn't do too much this year, just a few things here and there because I knew I would be coming home to visit my family for part of the month. Nonetheless, I enjoyed what I did put up so I'll do a little show and tell!


I absolutely loved my tree and if you saw my post of my boyfriend and I decorating it you might remember me saying that it was my first real tree since I was probably 10 years old. We got it from Costco for $27 and I thought it was perfect. It was tall, full and a great shape!

I put out a snow globe and a candy tray that I don't put candy in because it would cover up the cute pictures. I also put out a couple of my old Christmas books from when I was little and the little blow up reindeer is Clyde. I got him 2 years ago and for a whole year I didn't deflate him because he's so adorable!


I love adding these santa hat chair covers because they're so festive! 

The hurricane vase on the kitchen island isn't exactly what I was planning on doing, but I thought adding the little train around it with colorful presents and a bow transformed it for Christmas.

I put a couple of rustic looking decorations on the other side of the kitchen. My mom gave me the plate years ago and I just think this style of decor is so cozy. And yes, I'm VERY behind on my calendar :(


All of the crazy things in the vase are supposed to stick out of a Christmas tree but my boyfriend thought it was too over the top in my tree last year but I wasn't going to get rid of them! I recycled them by sticking them in this vase we already had and I put some small round ornaments in it to add some other color. This ended up being one of his favorite decorations! 

And how cute is the little snowman tea light holder? He's one of my favorites, he's precious :)

I also turned my plant Christmassy, which I thought was really cute to liven up the corner!
I bought two artificial poinsettias from Michaels to put on either side of the fireplace. After my bad experience with my mums dying so quickly I decided to go the artificial route! I also hung some ornaments from the windows and put a little garland with colored lights on our fireplace.  This fireplace is so difficult to decorate because there's no mantle! But I think I made it work well enough :)

For my vanity I just wrapped a pretty ribbon around my chair, put my snowman candle pedestal I got for my birthday out, I put another snowman votive holder on the window sill and I put garland around the window.

I had a few other little pieces sitting around but those are a few of my decorations in my little Christmas house! I hope you enjoyed and I hope you've had a great holiday season so far!

Saturday, December 21, 2013

Christmas Treat Decorated: Tree Brownies

As promised, here is my last post in the Christmas Treat series!

My mom recently got me a subscription to Taste of Home Magazine because she really enjoys it. All the recipes are from readers so even though they vary in difficulty, generally, they don't require a ton of weird ingredients and aren't super difficult. This was the first issue I received and I've been so happy with it so far! I decided to try the Christmas tree brownies that were featured on the cover and I wanted to share it with you guys!


I've never tried to do anything like this before so it was a bit of a learning process. Also, I decided to use a box of brownie mix to make it easier because I think this is something that can be done inexpensively and done on short notice as a fun family activity.  You don't have to have the ingredients to make royal icing, all of the different decorating gels and icings, sugar candies, baking chocolate etc. The only things I bought for this was a box of brownies and one can of frosting which came out to around $3. 

It would also be a fun alternative to regular brownies to take to a Christmas party or event.


1. Line your baking dish with aluminum foil and grease it. Make sure you get the edges where the foil creases really well! I didn't and I ended up having to cut them off.

2. Make your brownie batter and bake according to the box or your recipe!

3. If you're like me and you can't draw a stick, make a stencil  of the shape you're going for so you don't mess up the actual brownie.


4. Gather your decorating supplies. I just used green icing I bought and the sprinkles that came with it, Christmas sprinkles, edible pearls and powdered sugar that I already had.

5. Prepare your icing. I put about half the can in a bowl and put some powdered sugar and water in it to make it smoother. I also made a white icing just using powdered sugar, milk and vanilla extract.

6. When your brownies are done baking, lift them out of the tin foil after they've had a chance to cool. Then, refrigerate them because it'll make cleaner cuts with the stencil if it's cold.


7. Cut out your shape and save the extra pieces! You can decorate those or make a star from them for the top if you want.

8. Start decorating! I made a make-shift pastry bag with a ziploc for both icings. Tip: Do a thin first layer of frosting which I was taught to call the crumb layer. Brownies get flaky on the top so it's going to mix in with your frosting so if you do a thin first layer you can lock all of that down and then go back with a thicker layer to cover it up.


And we're finished! It's not exactly the one on the cover but I was pretty proud of it, I have to admit!

I will say that this was a little difficult. I got discouraged a couple of times when the brownies cracked and because I was trying to make it look perfect.  I'm not a professional so it just wasn't happening. It started to get fun when I stopped trying to make it perfect and just started decorating and enjoying it.

Next time I do this it will be much easier and if you guys try it and you follow my tips you won't have the same problems I did!

What do you guys think of how it turned out?

Happy baking and decorating!


Thursday, December 19, 2013

Late to the Party: Beauty Blender


It has finally happened you guys! I am now the proud owner of The Beauty Blender! Since I started wearing foundation years ago, I have always been a big fan of sponges. I feel like I get the best finish with a sponge because you get no streaks like a brush and you get good coverage unlike when I use my fingers because it ends up blending the foundation in too much for me. Until my birthday when my boyfriend gave me the Beauty Blenders, I've always used disposable sponges and been fine with it. However, since the Beauty Blender came out and got popular I've been itching to try it, but honestly, never wanted to spend $20 on a sponge, despite the amazing reviews.


I won't blab on too much about it because I know you've all seen it and heard about it by now, but before you apply your foundation you wet your beauty blender and you'll see that it expands to about twice the size than when it's dry. After you wet it, it becomes even softer and bouncier. It's honestly different than any sponge I've ever used before because of how light and airy it is, it feels like there's nothing to it when you squeeze it, but that's what makes it so awesome!

As for makeup application, it gives an amazing finish to the skin. It's a little dewy, especially at first because the sponge is wet, but once your foundation dries your skin will have a beautiful glow. It blends foundation and concealer in perfectly and it's of course, a great feature that it has the pointed end for under the eye and around the nose concealing.

You can also use these with powder products, which I have tried and it actually does do a nice job. I've found that it doesn't apply too much powder to an area and make it look cakey. It provides a light application that is blended perfectly and helps the makeup look like skin, not like layers sitting on top of it.  

 Keep in mind that you are technically supposed to replace these every three to four months so it can be a costly tool, but I cannot recommend it enough. It helps me get my foundation on faster than ever because of how big it gets when you wet it, and more natural looking than ever and I couldn't be happier about it! 

Tuesday, December 17, 2013

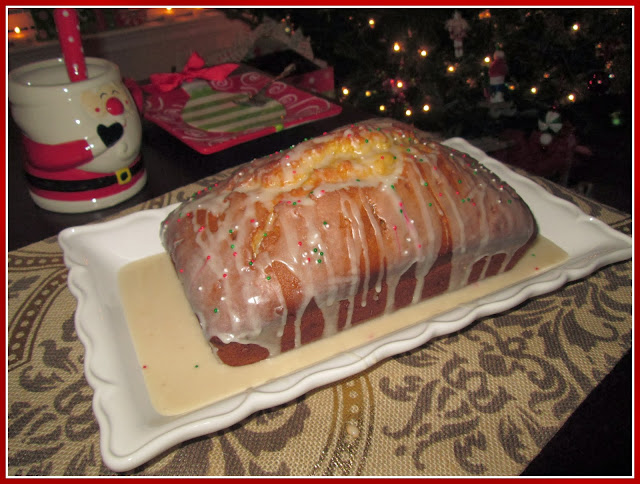
Christmas Treat Baking: Glazed Eggnog Loaf

This is Post #2 in my unofficial Christmas Treat series! By unofficial I mean I didn't plan it at all, I just ended up with three posts about sweets that are going to be going up close together, haha!


I'm not a fan of eggnog, but I absolutely love this eggnog loaf. It's so moist and has the perfect sweet/spice ratio. It's also great for breakfast because it keeps you full for a long time! I just started making this last year, but after the first one I made I kept making them to give to people because they are so delicious. I love having traditions and I think this is going to be one of mine because it was a big hit with me and with all of my family and friends as well :)

Enough chit-chattin', let's get baking!

Ingredients:
1 and 1/2 cups of regular eggnog (not low fat)
2 eggs

2 tsp Spiced Rum

1 cup white sugar
1 teaspoon vanilla extract
1/2 cup butter @ room temperature
2 1/4 cup all purpose flour
1 (3.4 ounces of powdered) package of instant French vanilla pudding mix
2 tsp baking powder
1/2 tsp salt
1/2 tsp ground nutmeg

*Note: You can substitute the Spiced Rum for Orange Juice :)

Directions:
Preheat oven to 350. Spray your loaf, muffin etc. pan with non stick spray.


1. In your mixer using the paddle – mix together the eggs, eggnog, rum, sugar, vanilla and butter. The butter will remain clumpy but that is just fine. 


2. In a separate bowl, sift the flour, pudding mix, baking powder, salt and nutmeg.

3. Add the dry mixture to the wet and blend until incorporated. Avoid over mixing. Again, the butter will remain clumpy and this is to be expected. The butter will melt when cooking.  The dough will be thicker – be aware.  


4. Pour into your prepared choice of pan(s).

5. Bake your mini loaves for approximately 30 minutes or until a toothpick comes out clean. A regular loaf pan will take about 45-55 minutes. Mine always take closer to the hour mark, at least.

6. I suggest using a toothpick or preferably a skewer to poke holes in your loaf so the glaze will sink inside and it'll be nice and moist when you cut into it!

Onto the Glaze!

I actually decided to use a different glaze recipe this year from the one you'll see listed if you go to the original blog post I got this from. Personally, I think the one I'm going to show you is thicker in texture and more rich in flavor.

Vanilla Glaze Ingredients {edited for this recipe}
 http://allrecipes.com/recipe/vanilla-glaze/
1 1/2 cups confectioners' sugar
2  tablespoons of milk
1/2 tablespoon of eggnog
1/8 teaspoon salt
1/4 teaspoon vanilla extract
1 teaspoon butter
1/8 teaspoon nutmeg (I used a little less than this because I wanted the glaze to stay white)


Once you've whisked it all together, it should be thick and a creamy white. I also like to add festive sprinkles to mine to add a little color!

Now I'm going to shamelessly share more pictures because I think it's so beautiful when it's finished!


I promise you guys will love this if you make it! I hope you've enjoyed this post!


*Original Recipe: http://kneadtocook.com/eggnog-bread/

Sunday, December 15, 2013

No Bake Christmas Treat: Peppermint Bark


I absolutely love peppermint and chocolate together and my boyfriend and I had been seeing peppermint bark pre-made in stores but we wanted to try to make it ourselves to have a bit of fun in the kitchen. I'm so glad we did because it's super easy and would make a great last minute treat if you're going to a Holiday party or need gifts to pass out to doctors, neighbors, etc.

Let's get started!


What You'll Need:
Tools:
1. Aluminum Foil
2. Cookie sheet or baking dish
3. Spatula or spoon to smooth the chocolate out
4. Something to break the chocolate up with once it hardens
5. Not Pictured: Double boiler

Ingredients:
1. 8 or 12 ounces of dark, milk, or semi-sweet chocolate depending on how much you want to make (I used milk chocolate the first time and semi-sweet the second and I preferred the milk, but I have a high sweet tolerance :)
2. 8 or 12 ounces of white chocolate
3. Candy canes or about 25 crushed peppermint candies
4. 1/4 tsp Peppermint Extract (1/2 tsp if you use 12 ounces or to taste)
5. Optional: Decorative Sprinkles!

Before we get started I just want to say that this is extremely easy to do, and you have a lot of leeway in terms of what ingredients you use and how much of them because it's really all about your tastes and your preferences. This isn't something that's getting baked, so it's okay if your measurements are a little off so just use what you like!


1. Fashion a double boiler. You don't want the bowl touching the water, so don't use too much and you don't want the water boiling. Put it on a low to medium heat. Start with your darker chocolate. We put in all of our chocolate at once, but it would be a little easier to put a small amount in at a time and keep stirring the chocolate to help it melt quicker. Add your peppermint extract once it's almost completely melted.

2. Pour in and spread out your chocolate into the pan. Make sure your aluminum foil is as smooth on the bottom as you can get it.

3. Add peppermints to your liking. (You don't have to put them on both layers, but we like it really minty so we did both)

3.5. Refrigerate your chocolate layer until completely hardened. It will be about one hour.


4. Once your first layer is hardened, do the same process with your white chocolate. Melt it in your double boiler, add in your peppermint extract, pour over your darker chocolate but work quickly because it'll start melting the dark chocolate.

5. Once you've gotten it smoothed out, sprinkle on your peppermint candies and sprinkles. Be sure to press them down with your fingers so they are in the chocolate and will have a better chance of staying in tact when you break it up. Refrigerate for another hour, or until this layer has completely hardened. 

6. Use your mallet or whatever you chose to break the bark up. Once we got a chunk broken off, we started using our hands also.

That's it! It's as easy as that and incredibly delicious! Not only that, but it looks pretty and festive as well :)

Happy candy making! And eating ;)

Friday, December 13, 2013

Outfit of the Day: Bundled up in the Snow

Happy Friday!! Today I wanted to share my outfit from this past Sunday, December 8th. We were just out running errands for most of the morning and by the time we were on the way home it started to snow! We got home just in time because we ended up getting close to two inches :)


I wore my new furry earmuffs I got for my birthday and a black faux fur shawl I guess you would call it. I had never worn the shawl before because I bought it last year on clearance after the season was over, so I was excited to try it out!


I also wanted to show you guys what I had on under all of the layers! When my mom came for Thanksgiving we both got two of these tunics. I have been loving them so much because they're really comfortable, and you can throw them on and look put together when it took no time at all.


Tassels and tassel necklaces have really been getting popular and I really wanted a tassel necklace but I couldn't find one that wasn't more than I was willing to pay, or one that didn't look too cheap and skimpy. Then I remembered that I had a necklace a friend gave me years ago with this chain tassel, but the actual chain that goes around your neck was shorter than I liked and had pearls and other jewels on it and was just a little too busy. I also have a necklace that has the perfect length chain that I wear a lot that my mom gave me and it has an amber colored heart pendant on it, so I took the tassel from the first necklace and put it on the long chain and TA DA! I had a tassel necklace just like that and it didn't cost me a cent!

Earmuffs- J Crew
Bow gloves- Target (4 years ago)
Faux Fur Shawl- New York and Company (Last year)
Coat- H&M (Last year)
Tunic- New York and Company
Pants- Lovefire brand from Belk
Boots- Michael Kors

It's snowed twice since Sunday and has been really exciting! Everything looks so much prettier covered in white :) Has it snowed where you live??

Wednesday, December 11, 2013

Christmas Tag!

Hope from Beauty&Bliss came out with this tag a couple of weeks ago and I thought it was really cute, plus you guys know I'm all about the holidays and being festive so I decided to join in!


1. What is your favorite thing about Christmas?
I love pretty much everything about Christmas! I love the decorations, the baked goods, the clothes, the colors, and it just seems like everyone is a little more cheery this time of year so I love that. I also love getting to spend time with family and going to light shows and things like that!


2. When you were a kid, what did you leave for Santa on Christmas Eve?
I'm pretty sure I just left him cookies of some kind. When I was young my mom and I would go all out and make cookies with cookie cutters, sprinkles, frosting and all that so I probably left those.

3. Do you and/or your family have any Christmas traditions?
My family on my Mom's side usually gets together on Christmas Eve for a little party where everyone brings appetizers and different dishes and we catch up with each other, eat a lot and open some presents.
A tradition that my Mom and I love is that we always watch A Christmas Story when we decorate our tree (when we can do it together) and on Christmas morning when we're opening presents...and the 24 hour marathon on tbs is a given.

4. When decorating, do you go all out or just do a small amount of decorating?
I think for some people, I go all out, and for others my decorating probably looks pitiful, haha. I try to have a little bit of decorations in every room, but nothing too over the top...for now ;)

5.  What is your favorite Christmas dinner food?
Our Christmas dinner is pretty much the same as Thanksgiving and I love all of it- the turkey, stuffing, mashed potatoes, rolls, etc. but what I really look forward to are everyone's appetizers at our Christmas Eve party. My favorites are sausage dip and homemade pimento cheese- yum!

6. What is your favorite Christmas movie?
A Christmas Story! I can watch it a thousand times and never be tired of it. But I also love How the Grinch Stole Christmas with Jim Carrey and the cartoon one, and all the Christmas cartoon/claymation classics. I also love to watch the abc family, Lifetime, and Hallmark movies.

7. What is your favorite Christmas song?
Again, I hate to choose a favorite, because I love all of the classics, but I get so excited when Mariah Carey's All I want for Christmas is You comes on :)

8. What was your favorite gift you've ever received?
I honestly can't think of one. I love pretty much all the gifts I'm given because someone thought of me when they bought it. I know that sounds cheesy, but it's true!

9. What is your favorite Christmas memory?
Hmm, I don't have anything specific, but probably making Christmas cookies with my Mom, decorating our tree with my parents and our Christmas Eve parties (Shh, I know I chose 3!)

10. Does it snow where you live?
Where I'm from we would get a little bit of snow some years, usually just an inch or two, if anything. Where I live now I believe it's about the same but it's a little further north so it's probably more likely to happen here and if you follow me on twitter or instagram you've probably seen pictures I've posted because it's already snowed twice!

11. Do you own an "ugly holiday sweater"?
I actually don't! I wish I did because they're so cute and festive! One year I'll buy one because I love them...well, maybe it won't be "ugly" but I would really like a Christmas sweater.

12. Hot chocolate or eggnog?
Hot chocolate, definitely. I'm not a fan of the taste of eggnog, it kind of tastes like bubblegum to me. However, one of my favorite Christmas recipes that I've started making involves eggnog and it's delicious! I'll be doing a post on that soon!

13. Have you ever been kissed under a mistletoe?
Nope!


So that's the end of the tag! I have a really hard time choosing a "favorite" anything if you didn't notice, haha! Thanks so much to Hope for creating this tag! I tag anyone else who wants to participate and if you do, let me know in the comments so I can check out your post!

Monday, December 9, 2013

DIY Christmas Lights Jug

When I was visiting home, my Mom and I went to the farmer's market and got this jug of apple cider because we've been obsessed with it this year. I brought it back with me and when my boyfriend and I finished it I knew I didn't want the jug to go to waste. I jumped on Pinterest and found this idea and decided this is what I wanted to do!

Let's get started!


1. To make the hole so that the strand of lights will come out the back you'll need a drill, a 1/4 inch glass drill bit, a mask to cover your face and some kind of eye protection even if it's sunglasses (so long as you can see what you're doing of course). You may also want to wear gloves to protect your hands.

2. Tape around where you want the hole to be as a guide.


3. When you begin drilling the hole, it needs to be in or under water to keep it cool because there's a lot of friction when you drill into glass! Also, take your time, don't rush this part of the process so that you don't crack the glass. As you can see, my boyfriend did it under running water from the kitchen sink and it worked perfectly.

4. The finished hole! Just big enough to get the lights through :)

Now onto the fun part!

What You'll Need & Directions: 

  1. A string of 50 lights, color or white. I tried 100 but it was WAY too many. I also tried lights on a white string because I thought it was more "indoor decor" but I actually preferred the green string. It's pretty self-explanatory but you'll just need to start pushing the lights through the hole you created. Be careful you don't break them because you might have to maneuver them to get them to fit.
  2. Some kind of decoration to dress it up a bit, I chose these two bells that are actually gift tags and I just snipped that part off! I liked the bells because I thought the jug already had a rustic vibe and the bells added to it, so just add your decoration of choice and that's it!


I really like the finished product. I think it's so cute and festive and adds more Christmas lights to my living room, which I love!
Related Posts Plugin for WordPress, Blogger...